

Global protests are being snapchatted too
Tutorial on using Snapchat and Snap Map to monitor, discover and preserve content related to developing crises
Tools needed: Screen recording tool (free options provided in article), Snap Map for web browser, Snapchat account (optional), Google Chrome (optional)
Skill Level: Basic
How to: Use Snapchat to Monitor Breaking Events
During a quickly developing crisis, the three main platforms that most open source researchers turn to for discovering information are Twitter, Facebook and YouTube. This post will explain why Snapchat, in particular the interactive Snap Map, should be added to this list of go-to platforms for monitoring and collecting content in real time.
Why Use Snapchat
In part due to its status as one of the newer social media platforms targeted towards younger demographics – as well as its design, which focuses more on users staying connected with friends than publicizing news or other information – Snapchat is often ignored by open source researchers. However, in July 2019, Snapchat reported 203 million active daily users, over 60 million more than Twitter, with over 3.5 billion “Snaps,” or individual pieces of content, uploaded each day. So why aren’t more OSINT researchers using it in their investigations?
Unfortunately, the app’s unique design presents a number of challenges for its use in many research situations. For one, there is no option to search for content based on keywords or other filtering criteria. Secondly, the short lifespan of all content uploaded to the platform, which disappears after 24 hours, make it an ineffective tool for discovering content related to past events.
Where Snapchat can be of use, as Digital Verification Corps (DVC) researchers discovered through our recent work on protests in Iraq, Chile and Hong Kong, is in monitoring ongoing situations, particularly those that are highly localized. This might include a demonstration taking place along a specific street, or an air strike reported in a particular neighbourhood. Using the app’s built-in Snap Map tool, which allows searches of publicly shared Snaps from users based on their location data at the time of uploading, OSINT researchers can focus in on a location of interest and access a stream of content shared from those coordinates over the past 24 hours. This can often provide extensive coverage of ongoing events. Additionally, because, as of writing, all content shared to Snap Map requires users to have location sharing turned on, Snap Map provides a reasonably reliable (though not foolproof) geotagging system, and since content is only hosted by the app for 24 hours, all content will be current to within a day of when it is accessed by the researcher. This contributes to both ease of verification and convenient access to corroborating accounts of the same events.
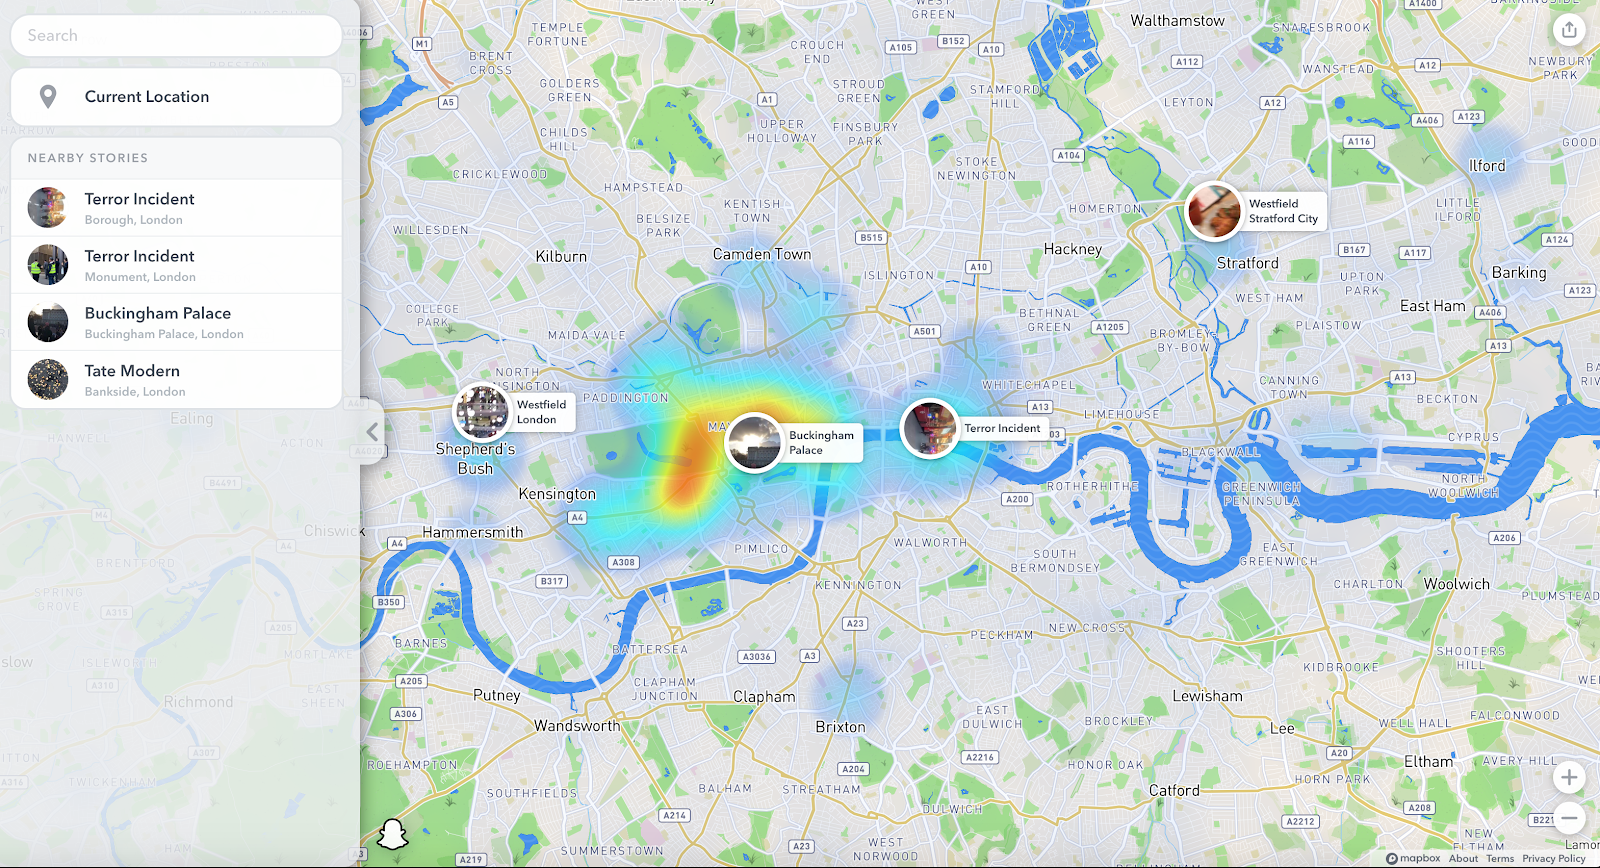
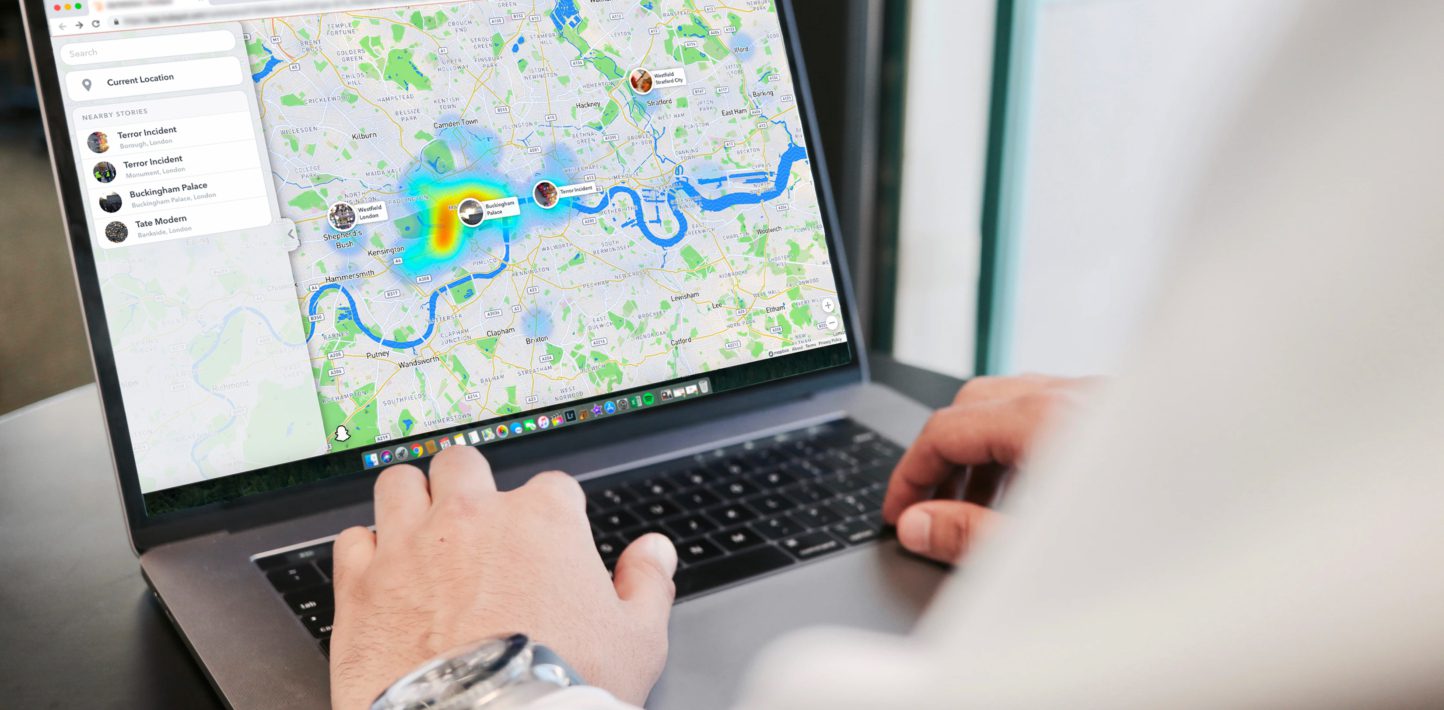
Snap Map view of London during a ‘Terror Incident’ at London Bridge on 29 November 2019
How to Use Snap Map
While you can access Snap Map via the Snapchat mobile app, most OSINT researchers will prefer to use the tool on their desktop via the web link – map.snapchat.com. Navigating to this page will open an interactive map where the researcher can use their cursor to click on specific locations or search for the names of cities or places from which you would like to see content. The user can also zoom using the ‘+’ and ‘-’ buttons in the bottom right-hand corner of the map. Doing so will show the Snap Map in greater detail, including the names of specific neighbourhoods, streets, and even individual buildings.
Snap Map is designed as a heat map. Light blue areas are where Snaps are being taken, while yellow, orange, or red areas indicate a high volume of Snaps uploaded from this location. Some of these ‘hot’ zones may also be tagged as part of a particular ‘Story’ created around specific locations or events, such as the above example from November 2019 labelled as a “Terror Incident” in London. Clicking on any of these areas will prompt a separate window showing a constant stream of all Snaps taken in this location or linked to that Story.
The clip below shows one instance where Amnesty International researchers were able to use Snap Map to monitor protests in Karbala, Iraq.
Retrieving Snapcodes
In the video above you will notice some clips that also contain an overlaid yellow square surrounding an avatar icon. These are called Snapcodes and serve as a means of identifying Snapchat users to add as Friends, allowing you to access their personal Stories, which would otherwise not appear on Snap Map. This could be useful if there is a particular user regularly posting content on Snap Map that is relevant to your investigation and you want to see if they have shared additional footage to their personal Story.
To scan the Snapcode, you must download the Snapchat app on a mobile device and create a personal account (best to use a burner phone). Using the Snapchat ‘Camera’ screen, press and hold the Snapcode on the Snap that you wish to scan and after a few seconds, the linked account name should appear with an option to ‘Add Friend.’
How to Preserve Content From Snapchat
Whether viewing publicly shared Snaps on Snap Map or the personal Stories of Friends, one of the challenges of using Snapchat for OSINT research is the temporary nature of the content. Thus, in order to use Snapchat for investigations, a method for recording and storing the content uploaded as permanent files is required.
One of the best ways of doing this is to simply record your screen as you navigate around Snap Map, using a screen capture application. This was how the above video from Karbala was created, allowing the footage from it to be verified, analysed and used in Amnesty’s reporting without concern that it would disappear before the final report was published. There are a number of screen capture applications that you can purchase and download for this purpose. However, this post will focus on free applications built into Mac and PC systems.
Built-In Screen Recorder on Mac
If you are using macOS Mojave, you already have access to a screen recorder which is included in the operating system. Simply enter [Shift]+[⌘]+[5] on your keyboard to bring up the controls for capturing video and still images from your desktop. You can select either to record the entire screen or just a portion of it and have a number of other settings you can adjust within the ‘Options’ tab.
If you’re using a different version of macOS, you can still record your screen using the pre-installed application Quicktime Player. Once you have opened the app, go to ‘File’ and select ‘New Screen Recording’. Click the large red circle to begin recording. Either click again to record the entire screen or click+drag to select a portion of the screen that you would like to record.
Built-In Screen Recorder on PC
Windows 10 has a built-in screen recorder included in the pre-installed Xbox Game Bar app. With your browser open, tap [Windows]+[G] on your keyboard to open the Xbox Game Bar app or search for and select the app in Windows Search. If prompted, click ‘Yes, this is a game’. Click ‘Start recording’ (large white circle) or tap [Windows]+[Alt]+[R] to begin recording your screen while you explore Snap Map. Use the same shortcut to stop recording when you have finished. Recorded videos will be saved as MP4 files in your Videos/Capture folder.
Download Individual Files Using Google Chrome Developer Tools
One alternative to preserving content using a screen recorder is to download the individual clips that you are interested in directly from Snap Maps using the ‘Developer Tools’ included in Google Chrome. In a Google Chrome window, open Snap Map. Then, select the ‘Customize and control’ icon (three stacked dots in upper right corner) and under ‘More tools’ click on ‘Developer Tools.’ Once there, select the ‘Network’ tab. As you click through Snap Map streams, individual .mp4 files will appear in the Developer Tools window, allowing you to double-click on the files that you are interested in preserving and download them directly from your browser. See the example below.
While the platform may be unfamiliar territory for some open source researchers, Snapchat and the built-in Snap Map offer exciting possibilities for use in OSINT investigations, different from what other social media platforms provide. The most obvious application of Snap Map is in monitoring developing crises in near real-time and sourcing eyewitness accounts filtered by the exact location where an incident has reportedly taken place. Few other tools can provide such a precise means of gaining perspective on the ground during a mass protest, a targeted attack, or other location-specific events. However, its applications are not limited to this. Snap Map can also be used alongside other satellite imagery and mapping tools to assist in geolocating a specific piece of content, potentially offering up-to-date imagery searchable to a particular location. Its ‘heat map’ feature may allow researchers to identify major events, indicated by dark red areas on Snap Map, before they are reported by news organizations or shared on other social media platforms. In short, while open source researchers might not find a use for Snapchat in every investigation, the app’s unique features make it a valuable addition to any OSINT toolbox.